Cracked grout can be an eyesore and can lead to further damage if not addressed promptly. For contractors, remodelers, and DIY enthusiasts alike, knowing how to repair cracked grout is an essential skill to maintain the longevity and appearance of tiled surfaces. In this blog, we will walk you through the steps to fully repair cracked grout, ensuring a professional finish and durable results.
Cracked grout can allow water to seep behind tiles, leading to mold growth, weakened adhesive, and structural damage. Repairing cracks promptly prevents moisture from penetrating the substrate.
Cracked grout can detract from the overall appearance of a tiled surface. Repairing the cracks restores the uniformity and cleanliness of the grout lines, enhancing the look of the tiles.
Properly maintained grout helps keep tiles securely in place. Repairing cracked grout prevents tiles from becoming loose or damaged, maintaining the integrity of the tiled surface.
Before you begin, make sure you have the necessary tools and materials:
Using a grout saw or rotary tool, carefully remove the cracked grout from the joints. Be sure to work slowly and steadily to avoid damaging the surrounding tiles. Remove all loose and damaged grout to create a clean, solid base for the new grout.
Once the cracked grout is removed, thoroughly clean the grout joints. Use a vacuum or brush to remove any dust and debris. Ensuring the joints are clean and dry will help the new grout adhere properly.
Follow the manufacturer’s instructions to mix the new grout. Make sure to match the color and type (sanded or unsanded) of the existing grout for a seamless repair. Mix the grout to a smooth, consistent texture.
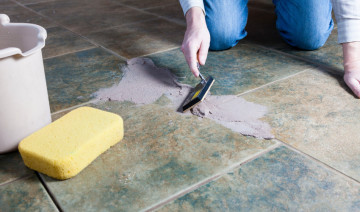
Using a grout float, apply the new grout to the joints. Hold the float at a 45-degree angle and press the grout firmly into the joints, ensuring they are fully filled. Work in small sections, and remove excess grout from the tile surface as you go.
Allow the grout to set for about 10-15 minutes, then use a clean, damp sponge to wipe away the excess grout from the tile surface. Rinse the sponge frequently and continue wiping until the tiles are clean. Be careful not to remove grout from the joints during this process.
Allow the grout to cure according to the manufacturer’s instructions, typically 24 to 48 hours. Avoid using the tiled area during this time to ensure the grout sets properly.
Once the grout has fully cured, apply a grout sealer to protect it from moisture and stains. Use a small brush or applicator to apply the sealer evenly to the grout lines. Allow the sealer to dry completely before using the tiled area.
Repairing cracked grout is a straightforward process that can significantly improve the appearance and durability of tiled surfaces. By following these steps and taking the necessary precautions, contractors, remodelers, and DIY enthusiasts can achieve professional-quality results. Regular maintenance and prompt repair of cracked grout will help protect tiled areas from water damage and keep them looking their best for years to come.

Comments